That gray, splintery deck in your backyard is more than just an eyesore; it can be a real safety hazard. Hidden rot, loose railings, and popped nails can turn a relaxing space into a liability for your family and friends. Taking action is about more than just aesthetics; it’s about making your outdoor space secure again. Learning how to restore a weathered wood deck is the best way to ensure its structural integrity and beauty. This guide will show you exactly how to inspect for dangers, make critical repairs, and apply a protective finish that provides peace of mind for every barbecue and quiet morning ahead.
A SUPERIOR CLEAN
Ready to Refresh
Your Property?
Gulf2Bay Softwash provides safe, eco-friendly exterior cleaning services that remove dirt, mold, mildew, and algae while protecting your home or business.
Key Takeaways
- Prep work makes all the difference: The final look of your deck comes down to the prep work. Before staining, you need to clean the surface thoroughly, sand away any gray or splintered wood, and fix any damaged boards or loose screws.
- Apply your finish with care: To get a smooth, even coat, pick a stain that fits your deck’s needs and apply it on a cool, overcast day. Work in small sections along the boards to prevent lap marks and ensure a professional-looking result.
- Keep it looking great with easy upkeep: A simple maintenance routine protects your hard work. Regularly sweep away debris, wash the deck once a year with a proper cleaner, and reapply sealer every few years, or when water stops beading on the surface.
Does Your Deck Need a Refresh? Here’s How to Tell
Before you start dreaming of summer barbecues on a beautifully restored deck, it’s important to play detective. Giving your deck a thorough once-over will help you understand exactly what you’re working with. Is it just a case of faded wood that needs a good cleaning and sealing, or are there deeper issues lurking beneath the surface? A careful assessment is the first step to a successful restoration project, ensuring you use the right techniques and materials for the job.
Figuring out the true condition of your deck helps you create a realistic plan. Some cosmetic issues are perfect for a weekend DIY project, while more significant problems might mean it’s time to call in a professional. Let’s walk through how to tell if your deck is just a little tired or in need of more serious help. This initial check will save you time and prevent surprises down the road, setting you up for a final result you can be proud of.
Spotting Structural Problems
The foundation of your deck is its most critical component. Before you think about stains or sealers, you need to confirm that the structure itself is sound. Start by walking across the entire surface, paying attention to any boards that feel spongy, bouncy, or unstable underfoot. “Before you do anything, make sure the main frame and the deck boards are solid,” as one DIYer wisely advises. “If any boards are not strong, you should replace them or flip them over.”
Get on your hands and knees and check the railings and staircases. Give them a firm shake to test for any wobbling. Then, if you can, look underneath the deck at the support posts and joists. You’re looking for any signs of rot, insect damage, or cracking. A solid structure is non-negotiable for a safe and long-lasting deck.
Identifying Surface Damage
Once you’ve confirmed the structure is solid, it’s time to examine the deck’s surface. Years of sun and rain can take a toll, leaving the wood looking less than its best. You’ll likely see gray, weathered boards, which are a clear sign the wood has been damaged by UV rays. You might also find splintering, cracks, or areas where old paint or stain is peeling away. These aren’t just cosmetic problems. “If you try to put a new coating on grey, weathered wood, the coating won’t stick well,” experts at Intergrain warn. The dry, porous wood will soak up the finish unevenly, resulting in a blotchy, dark appearance. Proper deck and cedar restoration starts with addressing this surface-level damage to create a clean slate for your new finish.
Recognizing Safety Hazards
While you’re inspecting your deck, keep a sharp eye out for anything that could be a safety risk. Some issues go beyond cosmetic and can pose a real danger to you, your family, and your guests. A simple but effective method is the screwdriver test. “If you feel soft spots when you walk, or if wood crumbles when you poke it with a screwdriver, parts of the deck or its frame might need to be replaced for safety.” This is a telltale sign of wood rot, which can seriously compromise the deck’s integrity. Also, look for nails or screws that have popped up, as they can be a tripping hazard. Rusted fasteners are another red flag, as they can fail and cause boards or railings to come loose. Addressing these safety hazards is the top priority before moving forward with any restoration work.
How to Assess Your Deck’s Condition
Before you get excited about picking out a new stain color, it’s important to give your deck a thorough health check. A simple inspection will tell you if your deck is a good candidate for restoration or if it has deeper structural issues that need attention first. Taking a few minutes to assess the condition ensures your hard work will last and, more importantly, that your deck is safe for your family and friends to enjoy.
This process helps you create a clear plan of action. You’ll know exactly which boards need replacing, what hardware needs tightening, and how much prep work is ahead of you. If you uncover major problems like widespread rot or a shaky foundation, it might be time to call in a professional for a deck restoration or replacement. Let’s walk through how to do a quick but thorough check-up.
Start with a Visual Check
Begin with a simple walk-around. Look closely at the deck boards, railings, and stairs. Are there any boards that look warped, cracked, or severely splintered? Pay attention to the main frame and support posts underneath the deck. Everything should look and feel solid. If you find a few boards that are in rough shape but the underlying structure is sound, you can often just replace them or even flip them over if the other side is in better condition. Make a note of any areas with significant graying, mildew, or old, peeling stain, as these will need special attention during the cleaning phase.
Test for Rot and Soft Spots
Wood rot is a deck’s worst enemy, so you’ll want to actively search for it. As you walk across the deck, pay attention to how it feels under your feet. Any bouncy or spongy areas are a major red flag. Next, take a screwdriver and gently poke any suspicious-looking spots, especially around posts, stairs, and areas that tend to stay damp. If the wood feels soft or crumbles easily, you’ve likely found rot. Unfortunately, rotted wood can’t be saved with a good cleaning and staining. For your family’s safety, these parts of the deck or its frame must be replaced. If the damage is extensive, you may need to consider building a new deck.
Inspect the Hardware and Fasteners
The nails, screws, and connectors holding your deck together are just as important as the wood itself. Check for any nails that have popped up, as they can be a tripping hazard and a sign that the boards are loosening. Over time, nails lose their grip, which is why modern decks use screws for a more secure hold. Look for any rusted screws or connectors, as rust can weaken the metal and stain the wood. Gently shake the railings and posts to make sure they are firm. If anything feels wobbly, the fasteners have likely come loose and will need to be tightened or replaced.
Gather Your Tools and Materials
Getting everything you need in one place before you start is the secret to a smooth, successful deck restoration. Think of it as your project command center. Having the right tools on hand means you won’t have to make frantic trips to the hardware store mid-project. You’ll primarily need supplies for cleaning, sanding, and of course, keeping yourself safe. Let’s walk through exactly what you should have ready to go.
Cleaning Supplies
First up, you need to give your deck a thorough cleaning. A high-quality wood deck cleaner is essential for cutting through built-up grime, mildew, and old, flaky stains. While you can use a stiff-bristled brush and some elbow grease, a pressure washer can make the job faster, but be careful not to damage the wood. For a truly effective and safe clean, we recommend professional-grade, eco-friendly solutions. At Gulf2Bay, we use our own line of Trident products because they are powerful enough to remove tough stains without harming your deck or the surrounding plants.
Sanding Gear
After your deck is clean and completely dry, sanding is what creates that beautiful, smooth surface ready for a new coat of stain or sealer. For most DIY projects, a random orbital sander is your best friend. You’ll also need sandpaper in a couple of different grits, typically starting with a coarser 60-grit for rough areas and finishing with a finer 80- or 100-grit for a smooth feel. A pole sander can also be helpful for sanding the main deck area without having to be on your hands and knees the whole time. This step is crucial for ensuring your new finish adheres properly.
Safety Equipment
Please don’t skip this part, your safety is the most important thing. When working with deck cleaners and stains, you’ll want to protect your skin and eyes. Grab a pair of waterproof gloves and some safety glasses or goggles. Sanding kicks up a lot of fine wood dust, so a dust mask is a must-have to protect your lungs. It’s also a good idea to wear old clothes you don’t mind getting dirty. Taking these simple precautions ensures your deck restoration project is not only successful but also safe from start to finish.
How to Clean and Prep Your Deck
Before you even think about picking a stain color, you need to give your deck a thorough cleaning. This is arguably the most important step in the entire restoration process, as a clean, well-prepped surface allows the new stain or sealer to penetrate the wood properly. This ensures you get a beautiful, long-lasting finish. Skipping this step is like painting over a dirty wall; the new coat won’t stick, and you’ll be left with a peeling, patchy mess sooner than you’d like. A proper cleaning removes built-up dirt, grime, and old, weathered wood fibers that make your deck look gray and tired. It also tackles any mold or mildew that may have taken hold, which is essential for the long-term health of your wood.
Think of it as giving your deck a fresh start. The goal is to get back to a clean, solid surface that’s ready to be protected and beautified. Taking the time to do this right will make all the difference in your final result and save you from having to redo the project next year. The process involves a few key stages: choosing the right cleaning solution, deciding on your cleaning method, and putting in the effort to scrub away years of buildup. Each stage is critical for stripping away the old and preparing for the new, transforming your deck from weathered to wonderful.
Pick the Right Cleaner
Walking down the cleaning aisle can be overwhelming, but choosing the right product is simple once you know what to look for. Step away from generic household soaps and opt for a product specifically formulated for wood decks. A proper wood deck cleaner is designed to cut through tough grime and organic stains without being too harsh on the wood itself. This prepares the surface so it can absorb a new layer of stain or sealer evenly. For the best results, look for a cleaner that can tackle mold, algae, and mildew. Many modern formulas are also eco-friendly, using biodegradable ingredients that are safe for your plants and pets.
Hand Cleaning vs. Power Washing
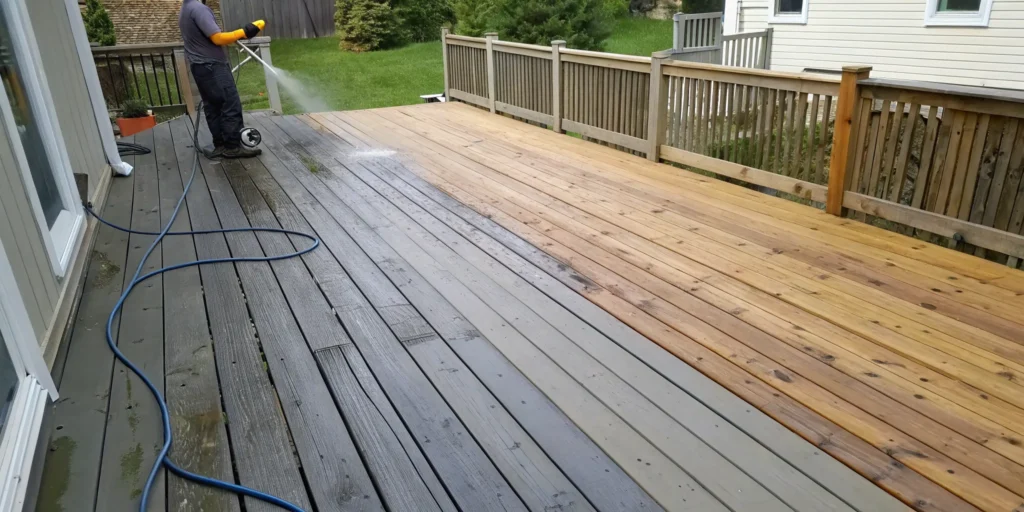
You might be tempted to blast away the grime with a power washer, but it’s important to proceed with caution. Power washers are powerful tools, and if used incorrectly, they can easily gouge or splinter the wood, causing permanent damage. This “fuzzing” of the wood grain not only looks bad but also makes the deck more susceptible to moisture and rot. A gentle hand scrubbing with a stiff-bristled brush is often a safer bet for a DIY project. If your deck needs a deeper clean, consider a professional approach. At Gulf2Bay, we use soft washing, a method that uses low pressure and specialized, eco-friendly solutions to remove grime safely. Our exterior cleaning services ensure a deep clean without the risk of damage.
Scrub Away Grime and Mildew
Once you’ve applied your cleaner, it’s time to put in some elbow grease. Scrubbing with a deck brush helps the cleaner penetrate the wood and lift away stubborn dirt and organic growth. This process does more than just clean; it also removes the top layer of dead, gray wood fibers. As you scrub, you’ll notice the wood’s natural color begin to reappear. This step is crucial for getting rid of any mold, algae, and mildew that can degrade the wood. A thorough scrub ensures these organisms are completely removed, not just bleached on the surface. This not only revitalizes the wood’s appearance but also creates a healthy foundation for your new stain or sealer.
What’s the Best Way to Sand Your Deck?
After a thorough cleaning, your deck is free of grime, but the wood itself might still look a little tired. This is where sanding comes in. It’s the step that truly transforms a weathered deck by removing the splintered, gray top layer of wood and creating a perfectly smooth surface. Think of it as a fresh start for your deck, preparing it to absorb a new coat of stain or sealer evenly. While it requires some elbow grease, sanding is what gives you that professional, polished look.
Sanding isn’t just about aesthetics; it’s also about longevity. A properly sanded surface allows the sealer to penetrate deeper and adhere better, offering superior protection against moisture and UV rays. This means your beautiful finish will last much longer. For this job, you can use a handheld orbital sander for smaller areas and corners, or rent a stand-up random orbital sander for larger surfaces to save your back. If the thought of all that dust and effort makes you pause, remember that a professional deck restoration service can handle this for you, ensuring a flawless result without the hassle.
Start with Coarse-Grit Sandpaper
Your first pass with the sander should use coarse-grit sandpaper, typically in the 50 to 60-grit range. This initial, more aggressive sanding is designed to do the heavy lifting. It will power through the fuzzy, weathered top layer of the wood, erase minor stains, and knock down any splinters or rough patches left over from cleaning. Don’t be shy during this step; the goal is to reveal the fresh, solid wood underneath. This is the most important part of the sanding process for restoring a grey weathered deck and setting the stage for a beautiful finish.
Always Sand with the Grain
Here’s a rule you should never break: always sand in the same direction as the wood grain. If you move the sander against or across the grain, you’ll create noticeable scratches and swirl marks that will be glaringly obvious once you apply the stain. Following the grain ensures a smooth, uniform texture across the entire deck. Take your time and work methodically, moving the sander in long, steady strokes along the length of each board. This simple technique is key to achieving a professional-quality result and is a non-negotiable part of how to restore an old deck properly.
Aim for a Smooth Finish
Once you’ve completed the initial pass with coarse-grit sandpaper, it’s time to refine the surface. Switch to a medium-grit sandpaper, like 80 or 100-grit, for your second pass. This step smooths out any roughness left by the coarse grit and creates a silky-smooth surface that’s ready for staining. After you finish sanding, be sure to vacuum or sweep away all the dust, then wipe the surface with a tack cloth. A clean, smooth deck is the foundation for a durable, long-lasting finish. If you want to ensure the job is done perfectly, you can always get a quote from our team for a professional touch.
Repair Damaged Boards and Hardware
With your deck clean and smooth, it’s time to play doctor. Before you even think about opening a can of stain, you need to address any structural issues. A fresh coat of sealer on a broken board is just a pretty cover for a safety hazard. Taking the time to make these small repairs ensures your deck is not only beautiful but also safe and sturdy for years of backyard barbecues and quiet mornings with a cup of coffee. These fixes create a solid, reliable foundation for the final finishing touches.
Replace Rotted or Splintered Boards
Walk across your deck and pay close attention to how it feels underfoot. If you feel any soft or spongy spots, that’s a red flag. A simple way to check is to gently poke any suspicious areas with a screwdriver. If the wood crumbles or feels soft, that board is likely rotted and needs to be replaced. The same goes for any boards with deep splits or splinters that could cause injuries. While replacing a board or two is a manageable DIY task, widespread rot, especially in the deck’s frame, is a much bigger issue. If the damage seems extensive, it’s best to get a professional opinion from a deck building expert.
Tighten Loose Screws and Nails
Over time, the natural expansion and contraction of wood can cause fasteners to loosen. This can lead to wobbly, squeaky boards that are both annoying and a potential tripping hazard. Go over your entire deck and look for any screws or nails that have popped up. Use a hammer to tap nails back into place, but for a more permanent fix, it’s better to secure loose boards with deck screws. Screws have greater holding power and are less likely to work their way out over time. This simple step will make your deck feel more solid and secure.
Fill Cracks and Gaps
Small cracks and gaps are a normal part of a wood deck’s life, but larger ones can collect water and debris, which accelerates rot. Before staining, inspect the surface for any noticeable openings. Make sure to hammer down any nails or screws that are sticking up so they sit flush with the wood. Then, use an exterior-grade wood filler or a special flexible caulk designed for decks to fill in any wide gaps or cracks. This creates a smooth, uniform surface for staining and helps protect the wood from moisture infiltration. A thorough deck restoration process ensures every detail is handled for a flawless finish.
How to Choose the Right Stain or Sealer
After all the cleaning and sanding, you’re finally at the fun part: choosing the finish that will protect your deck and make it look fantastic. This decision is a big one, as the right stain or sealer acts as a shield for the wood, protecting it from the elements and extending its life. The product you choose will define the final look, so it’s worth taking a moment to understand your options before you start applying it. Your choice will depend on the condition of your wood, your desired aesthetic, and how much maintenance you’re willing to do down the road.
Penetrating vs. Solid Stains
Your first big decision is between a penetrating and a solid stain. If your deck is older and has seen better days, with discoloration or a mix of old and new boards, a solid stain might be your best friend. It acts almost like a coat of paint, covering the wood’s surface to create a uniform, opaque color. This is perfect for hiding imperfections. On the other hand, if you love the natural look of your wood grain and want to show it off, a penetrating stain is the way to go. These stains soak into the wood, enriching its color while allowing the natural texture and grain to remain visible.
Oil-Based vs. Water-Based Sealers
Next, you’ll need to choose between an oil-based or water-based formula. Traditionally, oil-based sealers have been popular for their deep penetration and rich finish. They do a great job of conditioning the wood. However, they can have a strong odor and require mineral spirits for cleanup. Water-based sealers have come a long way and are a fantastic alternative. They have low odor, are better for the environment, and clean up easily with just soap and water. While some pros swear by oil-based products, modern water-based sealers offer excellent durability and a finish that lasts. We often use our own eco-friendly Trident products to get great results without the harsh chemicals.
Consider UV and Weather Protection
Living in New York means your deck has to endure everything from intense summer sun to snow and ice. That’s why your stain or sealer must offer serious protection. This isn’t just about making your deck look pretty; it’s about safeguarding your investment. Look for products specifically formulated with UV inhibitors to prevent the sun from graying and damaging the wood. Good sealers also include water repellents that stop moisture from soaking in, which prevents rot and warping. Professional deck and cedar restoration always prioritizes this protective layer to ensure your deck stays beautiful and functional for years.
Apply Stain and Sealer Like a Pro
You’re on the home stretch! After all the cleaning, sanding, and repairs, applying the stain or sealer is the final step that brings your deck back to life. This is where you protect all your hard work and give the wood that beautiful, rich finish. Taking your time here is key to getting a professional-looking result that lasts for years. It’s not just about making it look good; a proper seal protects the wood from moisture, UV rays, and the wear and tear of foot traffic. Think of it as the final layer of armor for your outdoor space.
Choosing the right product and applying it correctly can feel like a big task, especially with so many options on the market. If you’re feeling unsure or just want to guarantee a perfect result without the hassle, remember that professional deck and cedar restoration is always an option. Our team has the experience and tools to get it done efficiently. For those ready to tackle it themselves, let’s walk through how to get it done right. With the right technique and a little patience, you can achieve a flawless finish that will make you proud every time you step outside.
Watch the Weather
Timing is everything when it comes to staining your deck. The ideal conditions are an overcast day with low humidity and no rain in the forecast for at least 24 hours. You’ll want to avoid applying stain in direct, hot sunlight. When the stain dries too quickly, it can leave behind lap marks and an uneven, splotchy finish. Instead, plan to work in the early morning or late afternoon when the sun isn’t at its peak. A quick check of the weather forecast can save you from the headache of having to start over.
Use a Brush or Roller
For a smooth application, a combination of a brush and a roller is your best bet. Use a paintbrush to “cut in” the edges, stain between the boards, and cover railings and stairs. For the main deck surface, a roller on an extension pole will make the job go much faster. Work in small, manageable sections, about two or three boards at a time, and always maintain a wet edge. This just means you should apply new stain next to a still-wet area to prevent lines from forming where one section dried before you started the next. For the best protection, plan on applying two coats.
Allow for Proper Drying Time
Patience is a virtue, especially when waiting for stain to dry. After you’ve applied the first coat, you need to let it dry completely before adding the second. While some products may be ready for a recoat in as little as an hour, always check the manufacturer’s instructions on the can for specific drying times, as they can vary based on the product and weather conditions. Rushing this step can cause the second coat to peel or fail to adhere properly, undoing all your hard work. Once the final coat is on, give the deck at least 24 to 48 hours to cure before walking on it or moving your furniture back.
Keep Your Restored Deck Looking Great
You did it! After all that cleaning, sanding, and sealing, your deck looks brand new. Now, let’s make sure it stays that way. Consistent maintenance is the key to protecting your hard work and ensuring your outdoor space remains a beautiful, safe spot for years to come. A little attention throughout the year prevents dirt, grime, and weather from undoing your restoration efforts. By creating a simple cleaning routine, performing an annual check-up, and knowing when it’s time to reseal, you can easily preserve your deck’s finish and structural health.
Create a Cleaning Routine
Think of deck cleaning as light housekeeping for your outdoor space. A quick sweep every week or so will keep leaves, dirt, and debris from collecting in corners and between boards, where they can trap moisture and encourage mildew. For a deeper clean, plan to wash your deck once or twice a year. Using a proper wood deck cleaner is much better for your deck’s health than just soap and water. We recommend using eco-friendly products that are powerful enough to break down mold and algae but gentle enough that they won’t harm your wood, your family, or the surrounding landscape. This simple routine prevents buildup and keeps your deck looking fresh.
Perform an Annual Inspection
Once a year, take a few minutes to give your deck a thorough once-over. This quick inspection can help you catch small issues before they turn into costly repairs. Walk the entire surface and look for any boards that seem loose, soft, or bouncy. Check for popped nails or screws that need to be tightened or replaced. Pay close attention to areas near railings and stairs, as these are high-traffic spots. Most decks need this kind of care to truly last. If you spot significant damage, like widespread rot or unstable supports, it’s best to call in professionals for deck restoration to ensure your deck remains safe.
Know When to Reapply Sealer
Your deck’s sealer is its first line of defense against moisture and UV rays, but it doesn’t last forever. A good rule of thumb is to reseal every two to three years, but weather and wear can affect that timeline. An easy way to check your sealer is to sprinkle a little water on the wood. If the water beads up, your sealer is still doing its job. If the water soaks in and darkens the wood, it’s time to reapply. Before you do, the deck will need a thorough cleaning. Depending on the condition, you may also need to do some light sanding to get a smooth finish.
A SUPERIOR CLEAN
Ready to Refresh
Your Property?
Gulf2Bay Softwash provides safe, eco-friendly exterior cleaning services that remove dirt, mold, mildew, and algae while protecting your home or business.
Frequently Asked Questions
How often should I plan on restoring my deck? A full restoration like this isn’t an annual project. If you do the job right, the finish should last for several years. The real key is performing light, consistent maintenance. A yearly cleaning and inspection will help you catch small issues early. You should plan to reapply a fresh coat of sealer every two to three years, or whenever you notice that water no longer beads on the surface.
Can I just clean my deck and skip the sanding part? I know sanding feels like a lot of work, but it’s a step you really can’t skip if you want great results. Cleaning gets rid of surface-level dirt and mildew, but sanding is what removes the dead, gray layer of wood fibers. This fresh surface allows the new stain to soak in evenly and bond properly. Skipping this step often leads to a blotchy, uneven finish that will likely start to peel within a year.
My deck has a few soft, rotted spots. Does that mean I need a whole new deck? Not necessarily. If the rot is only in a few of the surface boards and the main support structure underneath is still solid, you can usually just replace the individual damaged boards. However, if you find that the rot is widespread or has affected the support posts and joists, it becomes a serious safety concern. In that case, it’s best to consult a professional to assess the damage and discuss repair or replacement options.
What’s the most common mistake people make when staining their deck? The biggest mistake I see is ignoring the weather. Applying stain in direct, hot sunlight is a recipe for a blotchy finish because the product dries too quickly, leaving lap marks. You should always work on an overcast day or in the cooler parts of the morning or evening. Rushing the drying time between coats is another common error that can cause the finish to fail prematurely.
How do I decide between a solid stain and a penetrating one? It really comes down to the condition of your wood and the look you want. If your deck is older and has a lot of imperfections or mismatched boards, a solid stain is a great choice. It acts like a coat of paint, providing a uniform color that hides flaws. If you love the natural beauty of your wood and want to see the grain, a penetrating stain is the way to go, as it soaks into the wood to add color while keeping the texture visible.