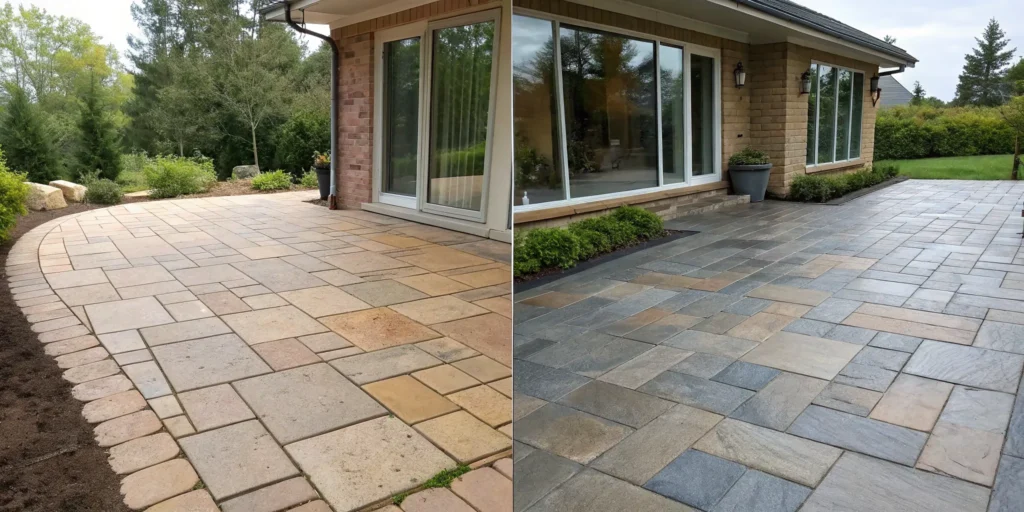
How much time do you spend pulling weeds from the cracks in your walkway or worrying about that oil stain on the driveway? Your beautiful pavers shouldn’t be a source of constant chores. Paver sealing offers a powerful solution to dramatically cut down on maintenance. By locking the joint sand in place, it creates a formidable barrier against weed growth and insect nests. It also forms a protective shield on the surface, making spills easy to clean up before they become permanent stains. The ‘sealing pavers before and after’ difference is about more than just looks; it’s about trading weekend work for more time enjoying your beautiful, low-maintenance outdoor space.
A SUPERIOR CLEAN
Ready to Refresh
Your Property?
Gulf2Bay Softwash provides safe, eco-friendly exterior cleaning services that remove dirt, mold, mildew, and algae while protecting your home or business.
Key Takeaways
- Sealing is your paver’s best defense: It’s not just about looks; sealing creates a vital shield against stains, weather damage, and UV fading. It also stabilizes the joints between pavers, which stops weed growth and prevents shifting.
- Proper prep is non-negotiable: For a lasting, professional finish, you must start with a perfectly prepared surface. This means deep cleaning the pavers, repairing any damage, and refilling the joints with polymeric sand before any sealer is applied.
- Application and upkeep are key: Always apply sealer in thin, even coats and pay close attention to the weather to avoid streaks or a hazy finish. Check if it’s time to reapply by sprinkling water on the surface; if it soaks in instead of beading, your protection has worn off.
What Does Paver Sealing Actually Do?
If you’ve invested in a beautiful paver patio, walkway, or driveway, you want it to stay looking great for years. That’s where paver sealing comes in. Think of it as the final, crucial step in protecting your investment. Sealing does more than just add a bit of shine; it’s a protective measure that defends your pavers against the elements, prevents stains, and makes your life a whole lot easier when it comes to maintenance. When done correctly, a professional paver cleaning and sealing service transforms your outdoor space, keeping it functional and beautiful. It works by creating an invisible shield that locks in the good stuff, like color and stability, while keeping the bad stuff out, like stains, weeds, and water damage. Let’s get into what paver sealing actually accomplishes for your property.
Enhances Color and Vibrancy
Over time, the sun’s UV rays can be harsh, bleaching the color from your pavers and leaving them looking dull and tired. Paver sealer acts like sunscreen for your hardscape, protecting the surface and locking in the original, rich tones. It can transform faded pavers, bringing their colors back to life with surprising vibrancy. Depending on the look you’re going for, you can choose a sealer that provides a glossy “wet look” which deepens the color, or a more subtle matte finish that looks completely natural. Either way, the result is a crisp, clean appearance that instantly improves your home’s curb appeal and makes old pavers look like they were just installed.
Protects Against Stains and Weather
Pavers are naturally porous, which means they can easily absorb spills and moisture. A sealer forms a durable, protective barrier on the surface, making it resistant to common culprits like oil from your car, grease from the grill, rust, and fallen leaves. This means spills are less likely to become permanent stains and are much easier to clean up. For those of us in New York, the protection against weather is even more critical. Sealer prevents water from seeping into the pavers, which is key to avoiding cracks during the destructive freeze-thaw cycles of winter. We use high-quality Trident products to ensure your pavers are shielded from water, snow, ice, and damaging UV rays.
Extends Lifespan and Reduces Maintenance
By protecting your pavers from stains and weather damage, sealing naturally extends their lifespan. But it also helps in another important way: stabilizing the joints. A good sealer will lock the sand between your pavers in place. This prevents the sand from washing away, which in turn stops pavers from shifting or becoming uneven. It also creates a powerful barrier against weed growth and ant hills, significantly cutting down on your maintenance tasks. Instead of spending your weekends pulling weeds or resetting wobbly pavers, you can simply enjoy your beautiful, stable outdoor space. It’s a proactive step that saves you time, effort, and money on future repairs.
How to Choose the Right Paver Sealer
Picking the right sealer for your pavers can feel like a high-stakes decision, but it doesn’t have to be complicated. The best choice depends on your goals, your local climate, and the type of pavers you have. Understanding the main types of sealers will help you find the perfect match to protect your investment and keep your patio, walkway, or driveway looking its best. It’s all about knowing the difference between a few key categories.
Once you know what you’re looking for, you can confidently choose a product that delivers the protection and finish you want. Let’s walk through the options so you can make an informed decision for your home.
Water-Based vs. Solvent-Based Sealers
One of the first choices you’ll face is between water-based and solvent-based sealers. Water-based formulas are known for being more environmentally friendly, with low odors and an easy cleanup process. They are a great option if you’re concerned about fumes or looking for a straightforward application. On the other hand, solvent-based sealers are praised for their durability. They tend to penetrate deeper into the paver, creating a strong bond that offers excellent, long-lasting protection against the elements. Many professionals prefer them for their superior performance and longevity.
Penetrating vs. Film-Forming Sealers
Next, you’ll need to decide if you want a penetrating or a film-forming sealer. Penetrating sealers work by soaking into the paver itself, creating an invisible shield that repels water and oil without changing the surface texture. These are ideal if you love the natural look of your pavers and want to maintain their original finish and traction. Film-forming sealers, like acrylics, create a protective layer on top of the paver. This film can enhance the color of your pavers, often creating a rich, “wet” look with a satin or gloss finish. The trade-off is that this surface layer can sometimes become slippery when wet.
Choosing a Sealer for New York Weather
Here in New York, our weather puts pavers to the test. From freezing winters to humid summers, your sealer needs to handle it all. For cold climates, a breathable sealer is essential. These formulas allow moisture that gets trapped inside the paver to escape, which prevents cracking and damage during our notorious freeze-thaw cycles. Penetrating sealers are often a great choice for this reason. You’ll also want a sealer with UV stability to prevent it from breaking down under the summer sun. As local experts, we exclusively use high-quality, eco-friendly products designed to withstand our region’s specific challenges, ensuring your pavers stay protected year-round.
How to Prepare Pavers for Sealing
Think of sealing your pavers like painting a room in your house. The final result is only as good as your prep work. Skipping these initial steps can lead to a finish that looks blotchy, fails quickly, and traps dirt underneath. To get that stunning, long-lasting protection for your patio or walkway, you need to start with a clean and stable foundation. Taking the time to prepare the surface properly ensures the sealer adheres correctly and gives you that beautiful, uniform look you’re after. It’s the most important part of the entire project, and getting it right will save you a lot of headaches down the road.
Start with a Deep Clean and Stain Removal
First things first, your pavers need to be completely clean. Any dirt, moss, algae, or old stains left on the surface will get trapped under the sealer, preserving the mess instead of the paver. This is about more than just a quick rinse with a garden hose. We’re talking about a deep clean that lifts stubborn grime from the pores of the stone. Oil spots from a car, rust marks from patio furniture, or organic growth common in New York’s humid summers all need to be treated. A professional paver cleaning service uses specialized techniques and cleaners to tackle these issues without damaging the pavers, creating the perfect blank canvas for sealing.
Inspect and Repair the Surface
Once your pavers are sparkling clean, take a walk around and inspect everything closely. Look for any pavers that are cracked, chipped, or uneven. Do any of them wobble when you step on them? Now is the time to fix these problems. Applying sealer over a damaged area won’t solve the underlying issue and can make future repairs more difficult. Replacing a cracked paver or leveling a wobbly one before you seal creates a safe, stable, and visually consistent surface. Addressing any masonry repairs at this stage is key to achieving that flawless, professional finish that will last for years.
Refill and Stabilize Paver Joints
The sand in the joints between your pavers is what locks them together and keeps them from shifting. Over time, weather and foot traffic can wash it away, leaving gaps where weeds can grow. Before sealing, you need to refill these joints with polymeric sand. This isn’t just regular sand; it contains polymers that harden when activated with water, creating a firm yet flexible bond. This new sand stabilizes the entire paved surface, prevents weed growth, and even deters ants. This step is crucial for the structural integrity of your patio or driveway and ensures a clean, uniform look once the sealer is applied.
Ensure the Surface is Completely Dry
Patience is a virtue, especially when it comes to this final preparation step. After a thorough cleaning and rinsing, your pavers need to be bone dry before any sealer is applied. Moisture is the number one enemy of a good seal. Applying sealer to a damp surface can trap water, resulting in a cloudy or hazy appearance that ruins the look of your pavers. This trapped moisture also prevents the sealer from bonding correctly, leading to premature peeling and flaking. We recommend waiting at least 24 to 48 hours after cleaning on a warm, sunny day. Always check the forecast to ensure you have a clear window without rain.
A Step-by-Step Guide to Applying Sealer
With your pavers prepped and ready, it’s time for the main event: applying the sealer. This is where you lock in all your hard work and give your pavers that fresh, protected finish. Proper application is key to getting a beautiful, long-lasting result without streaks or bubbles. Of course, if you’d rather leave it to the pros, our team at Gulf2Bay Softwash is always ready to help you get a quote. Let’s walk through the process.
Apply the Sealer Correctly
First things first, make sure you’re using the right product for your specific pavers and their location. For example, acrylic sealers are a popular choice for stamped concrete around pool decks because they offer a great finish and good protection. The best way to apply sealer is typically with a garden sprayer, a roller, or a combination of both. A sprayer allows for a thin, even coat, while a roller can help work the sealer into the texture of the pavers. Always read the manufacturer’s instructions, as choosing the right type of sealer and application tool is the first step to a professional-looking job.
Get Even Coverage and Avoid Streaks
The secret to a flawless finish is applying a thin, consistent coat. Work in small, manageable sections, and maintain a “wet edge” to prevent lap marks where your application areas overlap. If you’re using a roller, avoid pushing down too hard, which can cause bubbles. Penetrating sealers, which soak into the paver, are especially prone to looking blotchy if applied unevenly. It’s always better to apply two thin coats than one thick, heavy one. This ensures the sealer absorbs properly and dries into a uniform, protective layer without any distracting streaks.
Understand Drying and Curing Times
Patience is a virtue, especially when it comes to sealing pavers. It’s important to know the difference between drying and curing. A sealer might feel dry to the touch within a few hours, but it can take several days to fully cure and achieve maximum hardness and protection. This process is heavily influenced by the weather. Applying sealer in extreme heat, direct sunlight, or cold temperatures can ruin the finish. This is especially true in places with harsh climates, where breathable sealers are often necessary. Plan to keep foot traffic off the pavers for at least 24 hours and vehicle traffic off for 3 to 5 days.
Common Paver Sealing Mistakes to Avoid
Sealing your pavers seems straightforward, but a few missteps can turn a promising project into a frustrating do-over. Getting that flawless, protective finish means avoiding the pitfalls that trip up most DIY attempts. Rushing the prep work, ignoring the weather, or using the wrong technique can leave you with a blotchy, peeling, or slippery surface. Let’s walk through the most common errors so you can ensure your hard work pays off with beautiful, long-lasting results.
Skipping Proper Prep and Cleaning
This is the single biggest mistake you can make. You wouldn’t paint a dirty wall, and you shouldn’t seal a dirty paver. When a sealer looks uneven or fails to bead water, it’s almost always because the surface wasn’t cleaned properly. Any lingering dirt, grease, or old stains will prevent the new sealer from bonding to the paver itself, creating weak spots where the sealer will quickly fail. A thorough deep clean is the most critical part of the process, ensuring you have a pristine canvas for the sealer to adhere to and giving you that uniform, protected finish.
Ignoring Weather and Poor Timing
Your beautiful sealer job can be ruined before it even dries if you don’t pay attention to the forecast. Applying sealer in direct, hot sun can cause it to dry too quickly, leaving streaks. On the other hand, applying it when it’s too cold will prevent it from curing correctly. Rain is the enemy of fresh sealer; even a light shower can wash it away or cause a milky, cloudy appearance. As New York experts, we know our weather is unpredictable. Always plan for a clear, dry day with moderate temperatures to give your sealer the best chance to cure perfectly.
Using Incorrect Application Methods
How you apply the sealer is just as important as what you apply. Using too much sealer is a common error. It might seem like a thicker coat means more protection, but it often leads to a thick, plastic-like film that becomes extremely slippery when wet. This is a serious safety hazard, especially around pools. Over-application can also trap moisture, causing a white, hazy look that’s difficult to fix. Applying thin, even coats with the right tools is key. Using the right professional-grade materials and techniques ensures you get protection without creating a dangerous, slick surface.
How to Maintain Your Sealed Pavers
Sealing your pavers is a fantastic move for protecting your investment, but the work doesn’t stop once the sealer is dry. To keep that beautiful, just-finished look and ensure the protection lasts, a little routine maintenance goes a long way. Proper upkeep is simple and ensures your patio, walkway, or driveway continues to resist stains and weathering. It all comes down to gentle cleaning, knowing when it’s time for a refresh, and recognizing the signs that it’s time to call in a professional.
Best Practices for Regular Cleaning
Keeping your sealed pavers clean is easier than you might think. The best first step is to regularly sweep away leaves, dirt, and other debris to prevent staining and moss growth. For a quick refresh, you can rinse the area with a garden hose to wash away dust and pollen. If you notice tougher spots, a gentle cleaning solution is your best friend. Using our eco-friendly Trident products ensures you can lift dirt without harming the sealer or your surrounding landscape. This regular care maintains the protective barrier against water, ice, and UV rays, keeping your pavers looking their best.
Know When It’s Time to Reapply
No paver sealer lasts forever, especially with New York’s demanding weather. Most sealers need to be reapplied every three to five years, but this can change based on the sealer type and traffic. Instead of just marking a calendar, pay attention to visual cues. If you notice the vibrant color of your pavers has started to fade or the surface looks dull, it’s a good indicator that the sealer is wearing thin. Because cold climates require specific types of sealers, even the best products will eventually need a fresh coat to continue providing maximum protection.
Signs You Need Professional Help
How can you tell for sure that your sealer is failing? The easiest way is the water test. Sprinkle a little water on the surface. If it beads up and rolls off, your sealer is still working. If the water soaks in and darkens the paver, the protective barrier is gone. Other red flags include new stains that won’t wash away, weeds growing in the joints, or any visible peeling of the sealer. When you see these signs, it’s often best to call for professional help. We can properly strip any old sealer and apply a fresh coat to restore full protection. If you think it might be time, we’re here to help you get a quote.
Related Articles
- How to Clean and Seal Pavers: A Step-by-Step Guide
- Best Practices for Maintaining Your Outdoor Pavers
- Choosing the Right Paver Sealer for Your Home
- The Benefits of Professional Paver Sealing
- What Is the Longest Lasting Paver Sealer for Harsh Climates?
A SUPERIOR CLEAN
Ready to Refresh
Your Property?
Gulf2Bay Softwash provides safe, eco-friendly exterior cleaning services that remove dirt, mold, mildew, and algae while protecting your home or business.
Frequently Asked Questions
How often should I seal my pavers here in New York? A good rule of thumb is to reapply sealer every three to five years, but our harsh New York weather can play a big role. The best way to know for sure is to do a simple water test. Just sprinkle some water on your pavers. If it beads up nicely, your sealer is still doing its job. If the water soaks in and darkens the stone, it’s time for a fresh coat to restore that protective barrier.
Will sealing my pavers make them slippery, especially around a pool? This is a great question and a common concern. Pavers can become slippery if the wrong type of sealer is used or if it’s applied too thickly, creating a slick, plastic-like film. A professional application focuses on thin, even coats to prevent this. You can also opt for a penetrating sealer, which soaks into the paver to protect it from within without changing the surface texture or traction.
Can I just seal over old, dirty pavers to save time? I know it’s tempting to look for a shortcut, but sealing over dirty pavers is one of the biggest mistakes you can make. Any dirt, moss, or old stains will get trapped underneath the new coat, resulting in a blotchy, uneven finish. More importantly, the sealer won’t bond correctly to the paver, causing it to peel and fail much sooner. A thorough cleaning is the most important step for a beautiful, long-lasting result.
What’s the real difference between a “wet look” and a “natural” finish? The choice comes down to personal preference. A “wet look” sealer, as the name suggests, darkens the pavers and gives them a rich, glossy or satin sheen, as if they were just rinsed with water. This really makes the colors pop. A “natural” finish sealer is completely different; it’s designed to be invisible. It penetrates the stone to provide protection without altering the color or texture, preserving the original look of your pavers.
Is paver sealing a DIY project, or is it better to hire a professional? While it’s possible to seal pavers yourself, it’s a project where experience really matters. The process involves a lot more than just rolling on a coat of sealer; it requires deep cleaning, potential repairs, choosing the right product for our climate, and applying it correctly to avoid streaks or bubbles. Hiring a professional ensures the job is done right the first time, saving you from costly and frustrating mistakes.