Those dark streaks running down your roof are more than just an eyesore; they’re a sign of trouble. Caused by an algae called Gloeocapsa magma, these stains indicate that living organisms are feeding on your shingles, shortening your roof’s lifespan and hurting your home’s curb appeal. Letting this growth continue can lead to moisture retention, moss accumulation, and eventually, costly repairs. This guide is your complete resource for effective and safe asphalt shingle roof cleaning. We’ll walk you through how to identify the warning signs, gather the right supplies, and follow the correct steps to restore your roof’s appearance and protect your home’s structural integrity for years to come.
Key Takeaways
- Recognize the Warning Signs: Dark streaks, moss, and debris are not just cosmetic issues; they are signs of living organisms that are actively breaking down your shingles. Ignoring this growth can shorten your roof’s lifespan and lead to expensive structural problems.
- Choose Soft Washing Over Pressure Washing: Using a pressure washer on your roof is a fast way to cause irreversible damage by stripping away its protective granules. The industry-standard method is soft washing, which uses low-pressure water and specialized solutions to kill growth safely at the root.
- Prioritize Safety and Professional Expertise: Cleaning a roof is a risky job that can lead to falls or property damage. For steep roofs, extensive growth, or if you are uncomfortable with heights, calling a professional service is the smartest choice to protect both yourself and your home.
Is It Time to Clean Your Asphalt Shingle Roof?
Most of us don’t spend a lot of time looking at our roofs, but a quick glance can tell you a lot about your home’s health. Those dark streaks or green patches aren’t just affecting your curb appeal; they’re often signs of living organisms that are slowly damaging your shingles. Letting algae, moss, and debris sit on your roof can shorten its lifespan and lead to expensive repairs down the road. Think of it like a check-up for your home’s first line of defense against the elements.
Recognizing the early warning signs is key to protecting your investment. A clean roof is a healthy roof, and knowing what to look for can help you decide when it’s time for a professional roof cleaning. From subtle discoloration to obvious plant growth, each sign tells a story about what’s happening up there. Let’s walk through the four main indicators that your asphalt shingle roof is ready for a wash.
Dark Streaks and Stains
If you’ve noticed long, dark streaks running down your roof, you’re not alone. This is one of the most common signs that your roof needs attention. These stains are caused by a type of blue-green algae called Gloeocapsa magma, which travels by air and thrives in humid environments like ours in New York. The algae feeds on the limestone filler in your asphalt shingles, breaking them down over time. As it grows, it develops a dark, hardened outer layer to protect itself from UV rays, creating the ugly black streaks you see. Beyond being an eyesore, this growth can cause your shingles to absorb more heat, potentially increasing your home’s cooling costs.
Moss, Lichen, and Algae Growth
While dark streaks are caused by algae, you might also spot thicker, green, or fuzzy patches. This is likely moss or lichen. Moss is particularly damaging because it acts like a sponge, holding moisture directly against your roof’s surface. This constant dampness can accelerate shingle decay, and in the winter, it can lead to cracking during freeze-thaw cycles. As moss grows, its root-like structures can lift the edges of your shingles, making them vulnerable to being torn off by the wind. According to the Asphalt Roofing Manufacturers Association, this type of growth is a significant contributor to premature roof problems.
Debris and Granule Loss
A roof covered in leaves, twigs, and pine needles is more than just messy. This layer of debris traps moisture against the shingles, creating the perfect environment for mold, rot, and algae to flourish. A damp, decaying pile of leaves can even attract pests. You might also notice an accumulation of tiny, sand-like particles in your gutters. These are the protective granules from your asphalt shingles. While some granule loss is normal over a roof’s lifetime, a large amount can indicate that algae and debris are weakening the shingles’ surface, causing the granules to break free. Keeping your roof and gutters clean is essential for preventing this cycle of decay.
Warped or Curling Shingles
Take a close look at the edges of your shingles. Are they lying flat, or are they starting to curl up or look warped? This is a serious sign that your roof is in distress. Curling shingles are often a result of trapped moisture, which causes the shingle to swell and distort. This can also be a sign of advanced age or improper attic ventilation. Once a shingle starts to curl, it can no longer do its job of shedding water effectively, leaving your roof deck exposed to potential leaks and water damage. While a cleaning can’t reverse curling, removing the moss and algae that trap moisture can help prevent the problem from getting worse. If you see this, it’s a good time to get a professional opinion.
What Happens If You Ignore a Dirty Roof?
Those dark streaks or fuzzy green patches on your roof might seem like a minor cosmetic issue, but ignoring them can lead to some serious headaches down the road. A dirty roof isn’t just an eyesore; it’s a sign of potential problems that can affect your home’s structure and its value. Let’s break down what’s really at stake when you put off roof cleaning.
Risking Structural Damage and Moisture
That green, velvety moss might look quaint, but it’s your roof’s worst enemy. Moss acts like a sponge, trapping moisture against your shingles day and night. This constant dampness can lead to rot and deterioration of the shingle material. As moss grows, it can also get underneath your shingles, lifting and curling them. This breaks the watertight seal of your roof, creating perfect entry points for leaks and making the shingles vulnerable to being torn off by strong winds. What starts as a small patch of moss can quickly become a major source of water damage inside your home. A professional roof cleaning service can safely remove this growth and prevent these costly issues.
Lowering Your Curb Appeal and Home Value
Your roof makes up a significant portion of your home’s exterior, and a stained, dirty roof can tank your curb appeal. Those ugly black streaks, caused by algae, make your home look neglected and can prematurely age its appearance. If you’re thinking of selling, a dirty roof can be a major red flag for potential buyers, who may assume it needs expensive repairs or a full replacement. Regular cleaning not only keeps your home looking its best but can also extend the life of your shingles. By removing the organisms that feed on them, you protect your investment and maintain your property’s value. Ready to see the difference a clean roof can make? You can get a quote to learn more about the process.
Is Pressure Washing Safe for Asphalt Shingles?
It might seem like the fastest way to blast away grime, but using a pressure washer on your asphalt shingles is a definite no. That intense, high-pressure stream of water is far too aggressive for your roof. It can easily strip away the protective granules that cover your shingles. These granules are essential; they shield the asphalt from sun damage and help with fire resistance. Once they’re gone, your roof’s lifespan can be significantly shortened, leaving it vulnerable to leaks and costly repairs. Think of it as scrubbing a delicate sweater with a wire brush; the damage is immediate and irreversible.
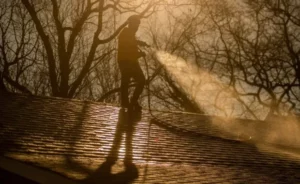
Experts across the roofing industry agree that the risks are just too high. The force can lift the edges of the shingles, breaking their waterproof seal and allowing moisture to seep underneath. This creates a perfect environment for rot and mold growth within your roof’s structure. Instead of reaching for a pressure washer, the industry-recommended method is a much gentler approach called soft washing. This technique is precisely what we specialize in for our roof cleaning services because it delivers a deep clean without causing harm.
Why Soft Washing Is the Safer Choice
Soft washing is the safer, more effective alternative for cleaning asphalt shingles. This method uses low-pressure water combined with a specialized cleaning solution to kill organic growth like algae, moss, and lichen at the root. The Asphalt Roofing Manufacturers Association (ARMA) actually recommends a cleaning solution to remove algae stains without damaging the shingles. Instead of relying on force, soft washing lets the cleaning agents do the heavy lifting. The solution is applied gently with a low-pressure sprayer, ensuring it cleans thoroughly without lifting shingles or forcing water where it doesn’t belong. This is the professional standard for a reason: it protects your investment while restoring your roof’s appearance.
How Soft Washing Protects Your Shingles
The soft washing process is designed to protect every part of your roof. After the cleaning solution has had time to work, it’s rinsed away with a gentle stream of water, similar to what you’d get from a garden hose. The key is to always rinse from the top of the roof down, which prevents water from being pushed up under the shingles and causing potential leaks. This careful technique is crucial for maintaining your roof’s integrity. Furthermore, soft washing effectively eliminates moss, which can curl up the edges of shingles and make them vulnerable to wind damage. By safely removing this harmful growth, you’re not just cleaning your roof; you’re actively preserving its structure and extending its life.
What to Gather Before You Start
Before you even think about climbing a ladder, it’s crucial to get all your ducks in a row. Proper preparation is the key to cleaning your roof safely and effectively. Taking the time to gather the right supplies and check the weather forecast will make the entire process smoother and prevent costly mistakes. Think of it as your pre-flight checklist for a successful roof cleaning mission.
Having everything you need within arm’s reach means you won’t be scrambling for supplies mid-job, which can be dangerous when you’re working at a height. From the cleaning mixture itself to your safety equipment and landscaping protection, each component plays a vital role. Let’s walk through exactly what you’ll need to get started.
The Right Cleaning Solutions
To tackle those dark streaks caused by algae, a common DIY approach is a cleaning solution made of equal parts water and bleach. This mixture is effective at killing the organic growth that’s staining your shingles. However, it’s important to handle bleach with care, as it can be harsh on both your property and the environment.
For a gentler yet powerful alternative, consider using professional-grade, eco-friendly products. These cleaners are specifically designed for exterior surfaces and can deliver amazing results without the risks associated with homemade solutions. They are formulated to remove stains and inhibit future growth, giving you a longer-lasting clean. We use our own line of Trident products to ensure a safe and thorough job.
Essential Safety Gear
Safety should always be your top priority when working on a roof. Never attempt this job without the proper gear. You’ll need a sturdy pair of non-slip shoes to ensure good footing, gloves to protect your hands from the cleaning solution, and safety glasses to shield your eyes from any splashes.
If your roof is particularly steep or your house is more than one story tall, it’s much safer to leave the job to a professional. Working at heights introduces serious risks that are best managed by trained and insured experts. If you have any doubts about your ability to do the job safely, it’s always best to get a quote from a professional service.
How to Protect Your Landscaping
The same solution that kills algae on your roof can unfortunately harm your beautiful garden below. Before you start spraying, take the time to protect your plants, shrubs, and grass. The best way to do this is to first water the soil and foliage around your home’s foundation thoroughly.
Next, cover your landscaping with plastic sheeting. This creates a physical barrier that prevents the cleaning solution from coming into contact with your plants. Make sure the sheeting is secure so it doesn’t blow away. This extra step is non-negotiable for preserving your curb appeal and is a standard part of any professional cleaning service.
Pick the Perfect Day to Clean
Your cleaning day’s success can depend heavily on the weather. The ideal conditions for cleaning an asphalt shingle roof are on a mild, overcast day with little to no wind. Aim for a day when temperatures are moderate, as extreme heat can cause the cleaning solution to evaporate too quickly before it has a chance to work.
A calm, cloudy day ensures the solution stays on the roof surface longer, allowing it to effectively break down algae and grime. Rain will wash your solution away prematurely, and wind can make working on a ladder unsafe while also causing the spray to drift. Check the forecast and choose a day that gives you a clear window to work.
How to Clean Your Asphalt Shingle Roof, Step by Step
Ready to tackle that roof? Following the right steps is key to getting a great result without accidentally damaging your shingles. This process isn’t just about spraying and rinsing; it’s about careful preparation, application, and follow-through. We’ll walk through the entire process, from the initial inspection to the final gutter clear-out.
Remember, safety is your top priority. Working on or around a roof can be risky, and handling cleaning chemicals requires care. If at any point you feel unsure or the job seems too big, it’s always best to get a quote from a professional. For those ready to take on the challenge, here’s your step-by-step guide.
Step 1: Inspect Your Roof
Before you mix any solutions, take a good look at your roof from the ground or a securely placed ladder. What are you dealing with? Identify areas with heavy staining, moss, or algae. Look for any loose, cracked, or damaged shingles that might need repair before you start cleaning. A thorough inspection helps you understand the scope of the job. Plus, regular cleaning can help your shingles last up to 30% longer, so think of this as a long-term investment in your home’s health and appearance.
Step 2: Mix Your Cleaning Solution
For a DIY approach, the Asphalt Roofing Manufacturers Association (ARMA) suggests a simple and effective solution. You can mix one part liquid chlorine bleach with one part water in a garden sprayer. For particularly stubborn stains, you can adjust the ratio to one part bleach and three parts water. While this works, it’s important to handle bleach with care. At Gulf2Bay, we use specially formulated eco-friendly products that are tough on grime but gentle on your property and the environment, which is always a great alternative to consider.
Step 3: Protect Your Plants
The bleach solution that cleans your roof can be harmful to the plants, grass, and shrubs below. Before you start spraying the roof, give your landscaping a good drink of water. Soaking the soil and foliage helps dilute any cleaning solution that might drip down. Next, cover your plants with plastic sheeting to act as a physical barrier. Once you’ve finished the entire roof cleaning and rinsing process, remove the plastic and give all your plants another thorough rinse with plain water to wash away any residue.
Step 4: Apply the Solution
Using your garden sprayer, apply the cleaning solution to a small, manageable section of the roof. Work from the bottom up to prevent streaks from forming as the solution runs down. Be sure to thoroughly saturate the stained areas, but avoid over-spraying, which can cause excessive runoff. Never use a pressure washer to apply the solution, as the high force can strip the protective granules from your shingles. The goal is to let the solution do the work, not force the grime off with high pressure.
Step 5: Give It Time to Dwell
Once you’ve applied the solution, let it sit on the shingles for about 15 to 20 minutes. This is called “dwell time,” and it’s when the magic happens. The solution works to break down the algae, moss, and lichen, lifting the stains from the surface. It’s very important that you don’t let the solution dry completely on the roof. If you’re working on a warm or breezy day, you may need to lightly mist the area with a bit more solution or water to keep it damp.
Step 6: Rinse with Low Pressure
After the dwell time is up, it’s time to rinse. Using a standard garden hose, gently rinse the roof from the top down. Rinsing from the top allows gravity to help you, washing all the loosened grime and cleaning solution down the roof and into the gutters. Never spray water in an upward direction, as this can force water up under the edges of your shingles and lead to moisture damage in your attic or roof deck. Remember, low pressure is your friend here.
Step 7: Clear Out Your Gutters
Your roof is clean, but the job isn’t quite done. The rinsing process has washed all the dead algae, moss, leaves, and other debris directly into your gutters. If left there, this gunk can create clogs, causing water to back up and potentially seep under your freshly cleaned roof. Carefully remove all the debris from your gutters and downspouts to ensure water can flow freely away from your home. A clean roof and clear gutters work together to protect your property, so don’t skip this final, crucial step.
Common Roof Cleaning Mistakes to Avoid
Cleaning your roof seems straightforward enough, but it’s surprisingly easy to do more harm than good. When you see those dark streaks or patches of moss, the first instinct is often to just get up there and scrub them away. But certain common mistakes can not only leave your roof looking worse, they can also cause expensive damage and seriously shorten its lifespan. As a homeowner, the last thing you want is to turn a simple cleaning project into a costly repair job.
Knowing what not to do is just as important as knowing the right steps to take. Think of it like this: you wouldn’t use a harsh scourer on a non-stick pan, and the same principle applies to your roof. Your shingles are a carefully engineered system, and treating them with the wrong tools or techniques can have lasting consequences. To protect your home and your investment, let’s walk through the most frequent errors homeowners make when trying to tackle roof cleaning on their own. Avoiding these pitfalls will help you get the job done safely and effectively, ensuring your roof stays healthy for years to come.
Using High Pressure
One of the biggest and most damaging mistakes you can make is aiming a pressure washer at your asphalt shingles. The intense, concentrated force of the water jet is incredibly destructive. It can easily lift and curl the edges of your shingles, blast away the protective granules that shield them from the sun, and force water underneath into your roof deck. This creates a perfect environment for leaks, rot, and the need for a premature roof replacement. A much safer and more effective method is soft washing, which uses low pressure, similar to a garden hose, combined with specialized cleaning solutions to kill organic growth at its root without harming your roof’s delicate surface.
Scrubbing Shingles Too Hard
Your roof’s asphalt shingles are covered in tiny, sand-like ceramic-coated granules that are essential for their longevity. These granules are the first line of defense, protecting the underlying asphalt from harsh UV rays that cause it to become brittle and crack over time. When you attack stains with a stiff-bristled brush or an abrasive tool, you’re essentially scraping away this vital protective layer. While it might seem like you’re getting the roof clean in the moment, you’re actually accelerating its aging process and making it more vulnerable to future damage. Always let the cleaning solution do the heavy lifting. If any agitation is needed, use only a soft-bristle brush with very gentle motions.
Working in Direct Sun or High Heat
Picking the right day to clean your roof is critical for success. If you apply a cleaning solution on a hot, sunny day, it will likely evaporate before it has a chance to work its magic. The solution needs to “dwell” on the surface for a period of time to effectively break down the algae, moss, and lichen that have taken hold. When it dries too quickly, its cleaning power is significantly reduced, and it can even leave behind a chalky residue or unsightly streaks. For the best results, choose a cool, overcast day with minimal wind. This will keep the roof surface damp longer and allow the cleaner to penetrate and kill the organic growth properly.
Choosing the Wrong Chemicals
Not all cleaners are created equal, and using the wrong one can be a disaster for your roof and your property. Harsh, abrasive chemicals can permanently damage the shingles, corrode metal flashing and gutters, and be toxic to the plants, pets, and people around your home. While some DIY guides suggest using a simple bleach and water mixture, getting the ratio wrong can be risky and ineffective. A safer bet is to use professional-grade, eco-friendly products specifically formulated for roof cleaning. These solutions are designed to be tough on organic growth but gentle on your home’s surfaces and the surrounding environment, so you can clean with confidence.
Walking on the Roof
Getting on your roof is dangerous, plain and simple. A surface covered in algae, moss, and a wet cleaning solution can be incredibly slippery, creating a serious fall hazard. Beyond the personal risk, just walking on asphalt shingles can cause them to crack or break, especially on older roofs where they may have become brittle with age. If your roof has a steep pitch or your home is more than one story tall, the risk increases exponentially. In these situations, it’s always best to keep your feet safely on the ground. Instead of risking injury or property damage, get a quote from a professional who has the right safety equipment and training for the job.
Forgetting to Clean Your Gutters
After you’ve rinsed your roof, where do you think all that dislodged algae, moss, and grime goes? Straight into your gutters. If you skip cleaning them out, you’re creating a dam that will prevent water from draining properly off your roof. Clogged gutters can lead to a cascade of problems, from water backing up under your shingles and causing rot in the roof decking to overflowing and damaging your home’s foundation. Make sure gutter cleaning is the final step in your roof maintenance project. This ensures your entire roofing system can function as it should, protecting your home from top to bottom.
Skipping Safety Gear
Attempting to clean your roof without the proper safety equipment is a risk that’s just not worth taking. Even for what seems like a small job, gearing up is essential. At a minimum, you need a sturdy ladder placed on even ground, non-slip footwear to maintain traction, and safety glasses to protect your eyes from chemical splashes and falling debris. Gloves are also crucial for protecting your skin from the cleaning solution. It’s always a good idea to have a spotter on the ground who can hold the ladder steady and be there in case of an emergency. Treating roof cleaning with the seriousness it deserves starts with prioritizing your safety above all else.
How to Keep Your Roof Clean for Longer
After putting in the effort to clean your roof, you’ll want to keep it looking fresh for as long as possible. A little preventative maintenance goes a long way in extending the time between cleanings and protecting your shingles from future damage. By taking a few proactive steps, you can create an environment where algae, moss, and lichen have a much harder time taking hold. This not only preserves your home’s curb appeal but also helps you avoid more intensive cleaning down the road. Think of it as setting your roof up for success. Simple actions like managing nearby trees and keeping your gutters clear can make a significant difference. For even more protection, you can explore specialized treatments and materials designed to fight organic growth from the start. These strategies work together to maintain your roof’s health and appearance, saving you time and money in the long run.
Install Zinc or Copper Strips
One of the most effective long-term solutions is to use the natural properties of certain metals to your advantage. You can install zinc or copper strips along the ridges of your roof. When it rains, water flows over these strips, carrying metallic ions down the roof slope. These ions are toxic to algae and moss, creating a protective barrier that helps prevent growth. If you’re getting a new roof, you can even choose asphalt shingles that already have copper granules mixed in for built-in resistance. This method is a fantastic, low-maintenance way to keep those dark streaks from returning.
Trim Overhanging Branches
The trees around your home are beautiful, but they can also contribute to a dirty roof. Branches that hang over your house create shade, which keeps your shingles damp and cool, the perfect conditions for algae and moss to thrive. They also drop leaves, twigs, and acorns that can trap moisture and decompose on your roof. A simple way to combat this is to trim tree branches back, allowing more sunlight to reach your roof and helping it dry out faster after it rains. This small bit of yard work can make a huge impact on your roof’s cleanliness.
Keep Your Gutters Clear
Your gutters are essential for directing water away from your home, and they play a big role in roof maintenance. When gutters get clogged with leaves and debris, rainwater has nowhere to go. It can back up and sit along the edge of your roof, seeping under the shingles and creating a constant source of moisture. This not only encourages algae and moss growth but can also lead to water damage and rot. Making sure to keep your gutters clean and free-flowing is a critical step in protecting both your roof and your home’s foundation.
Apply a Preventative Treatment
After a thorough cleaning, applying a preventative treatment can act as a shield for your roof. These treatments, often called biocides, work by creating an invisible barrier that makes it difficult for new algae, moss, or lichen spores to attach and grow. Gulf2Bay Softwash uses eco-friendly Trident products that are safe for your shingles and the environment. A professional application can keep your roof protected for several years, effectively resetting the clock on organic growth and maintaining that just-cleaned look for much longer.
Schedule Regular Inspections
Catching potential problems early is always better than dealing with a major issue later. Get into the habit of visually inspecting your roof from the ground, especially after heavy storms. Look for any new stains, debris buildup, or signs of damage. For a more thorough check, it’s wise to schedule a professional inspection every year or two. A trained expert can safely get on your roof and spot subtle issues you might miss, like loose shingles or failing seals, ensuring your roof remains in top condition for years to come.
When to Call a Professional Roof Cleaner
While tackling home maintenance projects yourself can be rewarding, roof cleaning often isn’t one of them. It’s a job that comes with serious risks, from personal injury to costly property damage. Knowing when to put down the ladder and pick up the phone is key to protecting both yourself and your home’s biggest asset. If your roof is particularly steep, your house is more than one story tall, or you’re just not comfortable with heights, it’s always best to call for help.
Sometimes, the decision comes down to weighing the risks. Trying to clean your own roof can easily go wrong, and some reports show that more than a quarter of DIY roof cleanings result in damage. That’s a significant gamble. A professional team not only has the right safety equipment but also the experience to get the job done right without harming your shingles or your property. They understand the nuances of different roofing materials and use specialized techniques to deliver a deep clean that lasts.
Know When It’s Not a DIY Job
Let’s be honest, the idea of saving a few dollars with a DIY project is tempting. However, roof cleaning is a different beast. Climbing a ladder with cleaning equipment is risky, and a fall can have serious consequences. Beyond personal safety, there’s a real chance of damaging your roof. Using the wrong pressure or a harsh chemical can strip away protective granules, void your shingle warranty, and lead to expensive repairs. If you’re facing extensive moss, stubborn algae stains, or a roof that hasn’t been cleaned in years, it’s time to call in a professional team. They have the training and specialized tools to handle the job safely and effectively.
What to Expect from a Professional Service
When you hire a professional, you’re paying for expertise and peace of mind. A reputable company will start with a thorough roof inspection to assess its condition and identify problem areas. From there, the team will set up safety gear and protect your landscaping before starting the cleaning process. Using a gentle soft washing method, they’ll apply a specialized, eco-friendly solution to kill organic growth at its source. After letting the solution work, they’ll rinse it away with low pressure. The service should also include cleaning out your gutters and a final inspection to ensure everything looks perfect. This entire process ensures a safer, faster, and more effective clean, giving you better results with zero risk of damage. If you’re ready to leave it to the experts, you can get a quote to start the process.
Related Articles
- Roof Cleaning & Soft Washing in Long Island | Gulf2Bay
- 2024 Roof Cleaning Costs: Top Services & Essential Tips
- How the #1 Professional Roof Cleaning Can Save You Thousands in Repairs
- #1 Long Island Roof Cleaning: Top Reasons Why It’s Essential for Year-End Home Care
Frequently Asked Questions
What are those long, dark streaks on my roof? Those unsightly streaks are actually a type of algae called Gloeocapsa magma. It travels through the air and settles on roofs, where it feeds on the limestone filler in your asphalt shingles. As it grows, it creates a dark, protective shell that results in the black stains you see. It’s not just a cosmetic issue; this algae holds moisture against your shingles and can slowly break them down over time.
What’s the difference between soft washing and pressure washing for a roof? The main difference is the force used. Pressure washing uses a high-pressure water jet to blast grime away, which is far too aggressive for asphalt shingles and can strip off their protective granules. Soft washing, the method professionals recommend, uses low pressure (similar to a garden hose) to apply a specialized cleaning solution. This solution does the hard work of killing algae and moss at the root, and then it’s gently rinsed away, protecting your roof from damage.
How often does my roof need to be cleaned? There isn’t a strict timeline, so it’s best to let your roof tell you when it’s ready. You should consider a cleaning when you first notice dark streaks, green moss patches, or a buildup of leaves and debris. After a professional soft washing, your roof can stay clean for several years. You can extend this time even further by trimming overhanging trees and keeping your gutters clear.
Is cleaning my roof just about making it look better? While a clean roof certainly improves your home’s curb appeal, the benefits go much deeper. Removing moss, algae, and trapped debris is a crucial part of home maintenance. This growth holds moisture against your shingles, which can lead to rot, shingle deterioration, and potential leaks. Regular cleaning protects your roof from premature aging and damage, helping you avoid costly repairs and extend its functional lifespan.
Will the cleaning process harm my garden and landscaping? A professional cleaning service will take specific steps to protect your plants. Before any cleaning solution is applied to the roof, the team will thoroughly water the plants, shrubs, and grass around your home’s foundation. They will then cover your landscaping with plastic sheeting to create a protective barrier. After the job is done, they will give everything another rinse with plain water to ensure no residue is left behind.